It does depend on how you apply it. Don't be stingy and use a point and shoot gun and not a fan spray one. As mentioned before leave it to do its work, it really is great at getting sticky stuff and tar off the car.rc944 wrote:the times i tried it on wheels i didnt shift the tar as easily as i thought it would but given its general praise in detailing circles i think it was just me
B3 3.2 Touring No.20 - Project Thread
-
shaziman
- ALPINA

- Posts: 1389
- Joined: Sun Sep 18, 2011 1:59 pm
- Location: Nottingham, occasionally S.Wales
1995 E36 B3.0 Convertible (rebodied)
1996 E36 B3.2 Touring No:20 - 1 of 5 made
1997 E36 B3.2 Touring No:36 - 1 of 5 made
1999 E36 323 Sport Touring
2011 E92 D3 Bi-turbo no.246 (santorini blue)
2019 Fiat Fullback
2020 Mini Countryman SE (PHEV)
Alpina, BMW and Detailing Enthusiast
1996 E36 B3.2 Touring No:20 - 1 of 5 made
1997 E36 B3.2 Touring No:36 - 1 of 5 made
1999 E36 323 Sport Touring
2011 E92 D3 Bi-turbo no.246 (santorini blue)
2019 Fiat Fullback
2020 Mini Countryman SE (PHEV)
Alpina, BMW and Detailing Enthusiast
You may find that the stuff you are trying to shift is not tar but brake dust residue. I've noted this myself.rc944 wrote:the times i tried it on wheels i didnt shift the tar as easily as i thought it would but given its general praise in detailing circles i think it was just me
Tardis works well on tar but doesn't make a blind bit of difference to the little black specs of burnt-on brake dust which only look like tar!
-
shaziman
- ALPINA
- Posts: 1389
- Joined: Sun Sep 18, 2011 1:59 pm
- Location: Nottingham, occasionally S.Wales
If this is the case, then you need to use a 'fallout remover'Chas wrote:You may find that the stuff you are trying to shift is not tar but brake dust residue. I've noted this myself.rc944 wrote:the times i tried it on wheels i didnt shift the tar as easily as i thought it would but given its general praise in detailing circles i think it was just me
Tardis works well on tar but doesn't make a blind bit of difference to the little black specs of burnt-on brake dust which only look like tar!
This convert the iron particles into to liquid (i think) and then they wash away.
I use an auto smart product, but the favourite is Car-pro Iron-X. It turns purple as it works so you can see it doing its job.
1995 E36 B3.0 Convertible (rebodied)
1996 E36 B3.2 Touring No:20 - 1 of 5 made
1997 E36 B3.2 Touring No:36 - 1 of 5 made
1999 E36 323 Sport Touring
2011 E92 D3 Bi-turbo no.246 (santorini blue)
2019 Fiat Fullback
2020 Mini Countryman SE (PHEV)
Alpina, BMW and Detailing Enthusiast
1996 E36 B3.2 Touring No:20 - 1 of 5 made
1997 E36 B3.2 Touring No:36 - 1 of 5 made
1999 E36 323 Sport Touring
2011 E92 D3 Bi-turbo no.246 (santorini blue)
2019 Fiat Fullback
2020 Mini Countryman SE (PHEV)
Alpina, BMW and Detailing Enthusiast


im actually trying a newish one called dragons breath by valet pro.... seems to work quite well.
im going to get more tardis though and give it another go i thin
im going to get more tardis though and give it another go i thin
Porsche 997.1 GT3 CS I Alpina E46 B3s Coupe I Alpina E46 B3 3.3 Touring I Ducati 749S Mono I Ducati 748R I Ducati 749 Track Bike I Ducati 916S
-
shaziman
- ALPINA
- Posts: 1389
- Joined: Sun Sep 18, 2011 1:59 pm
- Location: Nottingham, occasionally S.Wales
A few more updates:
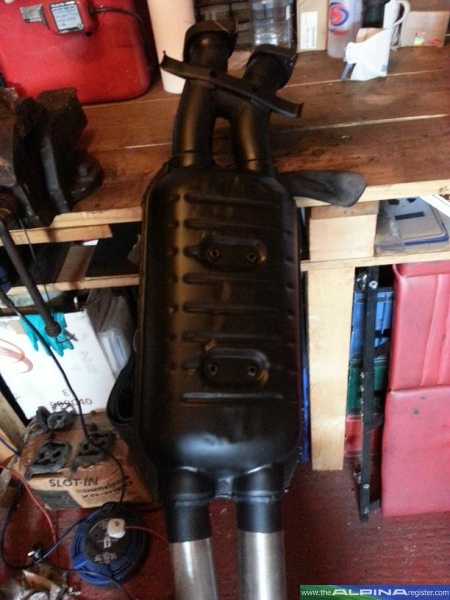
The really bad part of the exhaust is now cleaned up well after alot of elbow grease.

All Masked up ready for spraying

Sprayed. The prep was the key here, it has turned out superb bearing in mind how bad it was when i started.

Close up of the sprayed part

Wanted to get the shine up on the brushed finish on the backbox. This was a tester strip with Autosol.
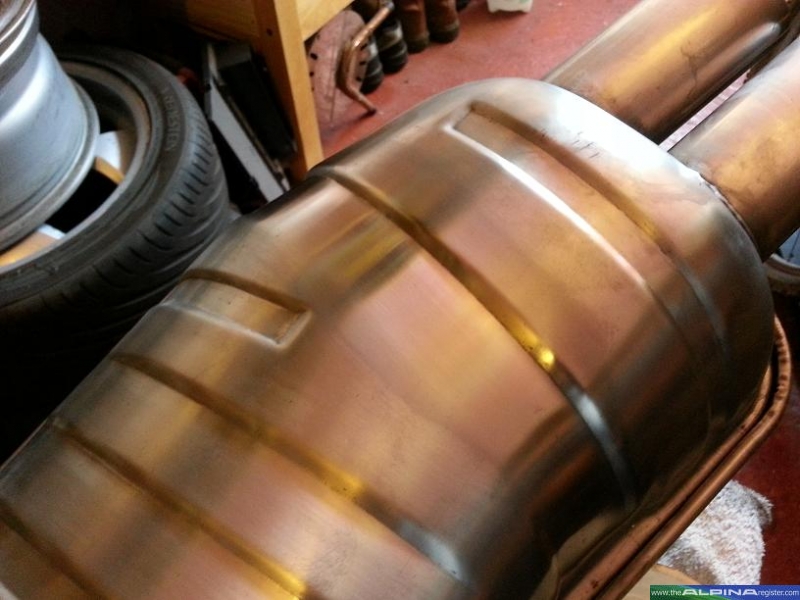

Half done


50:50 with the top (bottom in pic) half

Left pipe done, right as before

Finished Backbox

50:50 of the exhaust backbox hanger clamps. Deox'd for 2 days in the end to try and get the worst of it off.
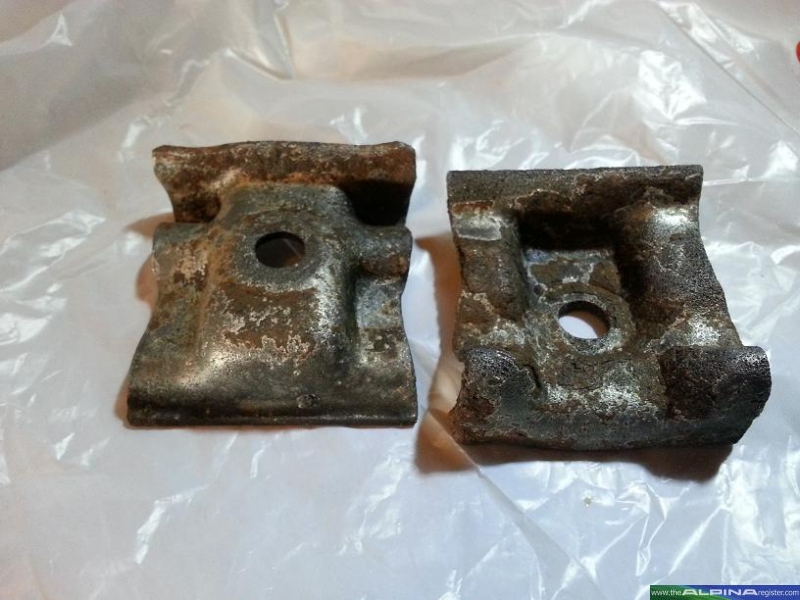
50:50 after wirebrushing

Body to exhaust brackets cleaned in Deox-c.

Will be sprayed tomorrow.
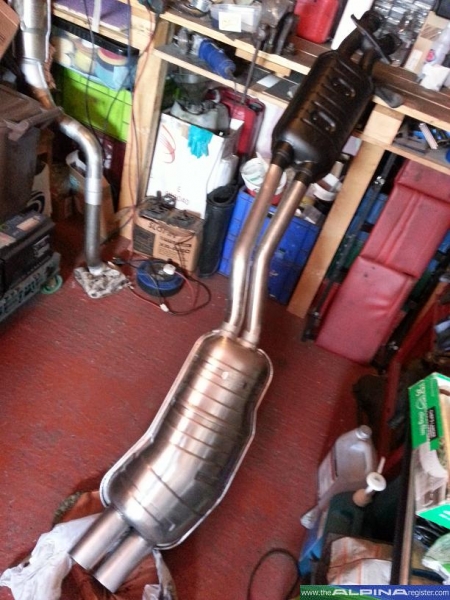
50:50 before and after of the exhaust

The really bad part of the exhaust is now cleaned up well after alot of elbow grease.
All Masked up ready for spraying
Sprayed. The prep was the key here, it has turned out superb bearing in mind how bad it was when i started.
Close up of the sprayed part
Wanted to get the shine up on the brushed finish on the backbox. This was a tester strip with Autosol.
Half done
50:50 with the top (bottom in pic) half
Left pipe done, right as before
Finished Backbox
50:50 of the exhaust backbox hanger clamps. Deox'd for 2 days in the end to try and get the worst of it off.
50:50 after wirebrushing
Body to exhaust brackets cleaned in Deox-c.
Will be sprayed tomorrow.
50:50 before and after of the exhaust
1995 E36 B3.0 Convertible (rebodied)
1996 E36 B3.2 Touring No:20 - 1 of 5 made
1997 E36 B3.2 Touring No:36 - 1 of 5 made
1999 E36 323 Sport Touring
2011 E92 D3 Bi-turbo no.246 (santorini blue)
2019 Fiat Fullback
2020 Mini Countryman SE (PHEV)
Alpina, BMW and Detailing Enthusiast
1996 E36 B3.2 Touring No:20 - 1 of 5 made
1997 E36 B3.2 Touring No:36 - 1 of 5 made
1999 E36 323 Sport Touring
2011 E92 D3 Bi-turbo no.246 (santorini blue)
2019 Fiat Fullback
2020 Mini Countryman SE (PHEV)
Alpina, BMW and Detailing Enthusiast
-
shaziman
- ALPINA
- Posts: 1389
- Joined: Sun Sep 18, 2011 1:59 pm
- Location: Nottingham, occasionally S.Wales
Some of the process is in the pictures but in summary:rc944 wrote:Great work. What was the process for the back box
1) Wash with APC
2) Remove paint with Nitromors
3) Remove tar and fallout with Tar remover and fallout remover
4) rub down with coarse emery cloth progressing to fine
5) use a scotchbrite pad coarse to fine to remove scratching
6) remove residue with IPA
7) use Autosol Metal Polish to clean surface and generate shine
9) Buff with microfibre
10) Seal with a wheel sealant (i used Poorboys)
Wheel sealant as it is somewhat heatproof.
1995 E36 B3.0 Convertible (rebodied)
1996 E36 B3.2 Touring No:20 - 1 of 5 made
1997 E36 B3.2 Touring No:36 - 1 of 5 made
1999 E36 323 Sport Touring
2011 E92 D3 Bi-turbo no.246 (santorini blue)
2019 Fiat Fullback
2020 Mini Countryman SE (PHEV)
Alpina, BMW and Detailing Enthusiast
1996 E36 B3.2 Touring No:20 - 1 of 5 made
1997 E36 B3.2 Touring No:36 - 1 of 5 made
1999 E36 323 Sport Touring
2011 E92 D3 Bi-turbo no.246 (santorini blue)
2019 Fiat Fullback
2020 Mini Countryman SE (PHEV)
Alpina, BMW and Detailing Enthusiast
-
greenelekta

- ALPINA
- Posts: 1233
- Joined: Fri Apr 27, 2012 9:36 am
-
shaziman
- ALPINA
- Posts: 1389
- Joined: Sun Sep 18, 2011 1:59 pm
- Location: Nottingham, occasionally S.Wales
Today's work:
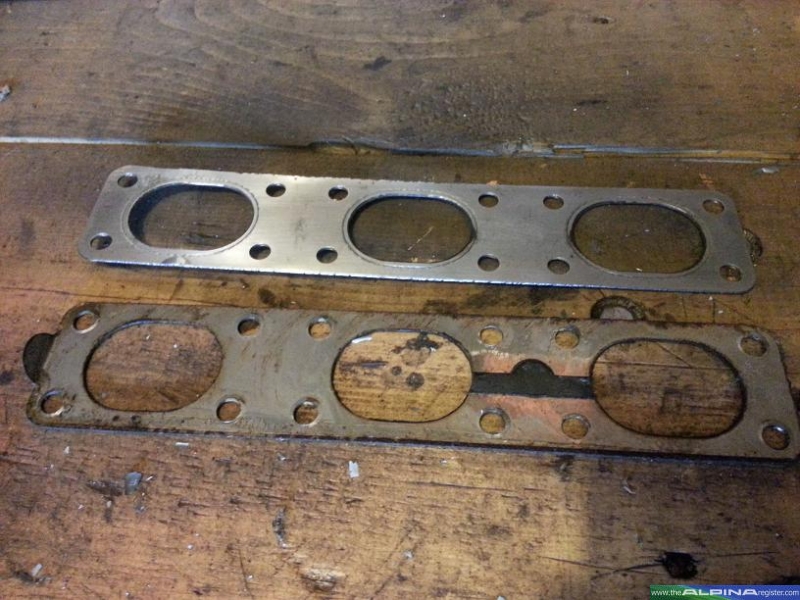
Exhaust Gaskets cleaned up. 50:50
Exhaust Bracketry all cleaned and painted and all nuts/bolts replaced with stainless:

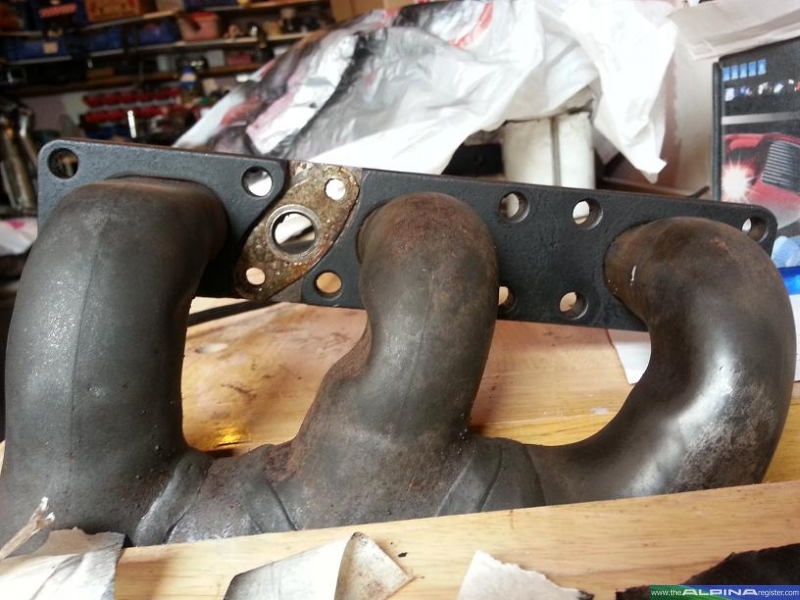
Cleaning the exhaust manifolds and polishing is fruitless, they will discolour immediately and take a long time to achieve. The only thing i did was clean up the mating flanges and then paint them as per the rest of the system. This will protect from surface corrosion in the long run.

Slight digression, but i needed something to do whilst paint was drying! I'm always on the lookout for bits for both tourers so am scouring eBay whenever i get a chance. I found a guy in Cardiff breaking a Boston Green 325TDS Tourer with a beige interior. I didn't have any details on it, but could tell from the parts this guy was selling that it was original and he had just started selling as it was only the obvious bits on the bay. I rang him and popped over Tuesday evening. 3 hours of playing with his car as it was in a single garage with parts all over the place on it, next to it and under it! Eventually i got a new front bumper (without the Alpina splitter) which was what i actually went for as it was cheap, in good nick and with fog lights (which mine is missing), boot trim, headlamp switch, bonnet catches, Lux side skirts and countless bits and bobs for both cars. I am due to go back for more but only when he has actually broken the car a bot more as it was a PITA to see what was on the car with all the stuff on it. Anyways, i actually bought more than intended as the guy was selling really cheap!
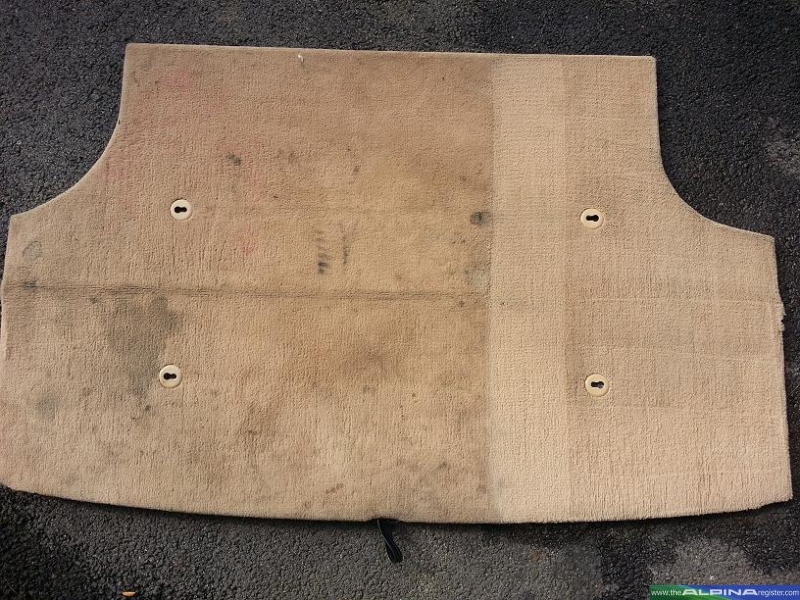
Here is the boot floor i bought. Not great as it had a leaking oil can on it and also the the turbo intercooler openended on the beige carpet! Idea is to use this one for day-to-day and use the other one earlier in the thread as the mint original one.
Before:

Tested my method and it was working!
Finished! Still some minor red staining on it but not really bothered!

LHS Boot trim before:

After:

50:50 LHS to RHS Boot trim. I wanted the RHS boot trim as in the car the insides of the trim had been cut away by the previous owner to find a home for his excessive amplifier. Now with this trim this will be sorted and also came with a free warning triangle!

RHS Trim Before:

RHS Trim After:

The Boot Floor handle was broken.

Easy Fix!

Back to the exhaust system, found this on the Lambda Probe wiring when i was painting the manifold. Will sort this with a soldering iron tomorrow. I will have to butcher the top of it though to gain access.

Exhaust Gaskets cleaned up. 50:50
Exhaust Bracketry all cleaned and painted and all nuts/bolts replaced with stainless:
Cleaning the exhaust manifolds and polishing is fruitless, they will discolour immediately and take a long time to achieve. The only thing i did was clean up the mating flanges and then paint them as per the rest of the system. This will protect from surface corrosion in the long run.
Slight digression, but i needed something to do whilst paint was drying! I'm always on the lookout for bits for both tourers so am scouring eBay whenever i get a chance. I found a guy in Cardiff breaking a Boston Green 325TDS Tourer with a beige interior. I didn't have any details on it, but could tell from the parts this guy was selling that it was original and he had just started selling as it was only the obvious bits on the bay. I rang him and popped over Tuesday evening. 3 hours of playing with his car as it was in a single garage with parts all over the place on it, next to it and under it! Eventually i got a new front bumper (without the Alpina splitter) which was what i actually went for as it was cheap, in good nick and with fog lights (which mine is missing), boot trim, headlamp switch, bonnet catches, Lux side skirts and countless bits and bobs for both cars. I am due to go back for more but only when he has actually broken the car a bot more as it was a PITA to see what was on the car with all the stuff on it. Anyways, i actually bought more than intended as the guy was selling really cheap!
Here is the boot floor i bought. Not great as it had a leaking oil can on it and also the the turbo intercooler openended on the beige carpet! Idea is to use this one for day-to-day and use the other one earlier in the thread as the mint original one.
Before:
Tested my method and it was working!
Finished! Still some minor red staining on it but not really bothered!
LHS Boot trim before:
After:
50:50 LHS to RHS Boot trim. I wanted the RHS boot trim as in the car the insides of the trim had been cut away by the previous owner to find a home for his excessive amplifier. Now with this trim this will be sorted and also came with a free warning triangle!
RHS Trim Before:
RHS Trim After:
The Boot Floor handle was broken.
Easy Fix!
Back to the exhaust system, found this on the Lambda Probe wiring when i was painting the manifold. Will sort this with a soldering iron tomorrow. I will have to butcher the top of it though to gain access.
1995 E36 B3.0 Convertible (rebodied)
1996 E36 B3.2 Touring No:20 - 1 of 5 made
1997 E36 B3.2 Touring No:36 - 1 of 5 made
1999 E36 323 Sport Touring
2011 E92 D3 Bi-turbo no.246 (santorini blue)
2019 Fiat Fullback
2020 Mini Countryman SE (PHEV)
Alpina, BMW and Detailing Enthusiast
1996 E36 B3.2 Touring No:20 - 1 of 5 made
1997 E36 B3.2 Touring No:36 - 1 of 5 made
1999 E36 323 Sport Touring
2011 E92 D3 Bi-turbo no.246 (santorini blue)
2019 Fiat Fullback
2020 Mini Countryman SE (PHEV)
Alpina, BMW and Detailing Enthusiast
-
shaziman
- ALPINA
- Posts: 1389
- Joined: Sun Sep 18, 2011 1:59 pm
- Location: Nottingham, occasionally S.Wales
As you may have seen from the last picture, someone has been here before. The top has been compressed for some reason by an animal when you compare it to the lambda on the other manifold. I may need to replace this sensor in due course, but its easily accessible and i have already removed them, cleaned up the threads and put anti-seize on them before refitting them.
I had to remove some of the material at the top and remove the rubber filling to ensure that i could get adequate access to repair the wires. Herei have split the top part of the casing folded it over to remove the sharp edges and then soldered the damage on each wire.

I have now insulated it, heat shrunk the insulation down so it won't peel and then filled the top with Araldite to stop it from moving. This should last long and not allow the wires to be damaged by sharp edges again.

Started reassembling the head now. First thing was to clean up the threads that might give me grief when reassembling on the car. This is a worth while investment as it will save time, frustration and also loads of scrapped knuckles in awkward places! This is a picture of one of the vanos housing studs before:

After:

Exhaust Studs before:

After. Had to do these with an M6 nut drilled out to 6mm and then tapped to M7x1mm thread as i couldn't get an M7 Die nut anywhere. A normal die wouldn't fit with a wrench with no handles, so this was the only option. I will be refitting the exhaust manifold off the car, so i'm not too bothered as i will have great access.

Refitted Cam sensor. Coolant temp sensor, blanking bolt and pipe removed cleaned and then put back to specified torque.

Still waiting for the inlet manifold. I have been promised Tuesday, so we'll have to see as now i am ready to start reassembly (I think) and its the only thing i am waiting for!
I had to remove some of the material at the top and remove the rubber filling to ensure that i could get adequate access to repair the wires. Herei have split the top part of the casing folded it over to remove the sharp edges and then soldered the damage on each wire.
I have now insulated it, heat shrunk the insulation down so it won't peel and then filled the top with Araldite to stop it from moving. This should last long and not allow the wires to be damaged by sharp edges again.
Started reassembling the head now. First thing was to clean up the threads that might give me grief when reassembling on the car. This is a worth while investment as it will save time, frustration and also loads of scrapped knuckles in awkward places! This is a picture of one of the vanos housing studs before:
After:
Exhaust Studs before:
After. Had to do these with an M6 nut drilled out to 6mm and then tapped to M7x1mm thread as i couldn't get an M7 Die nut anywhere. A normal die wouldn't fit with a wrench with no handles, so this was the only option. I will be refitting the exhaust manifold off the car, so i'm not too bothered as i will have great access.
Refitted Cam sensor. Coolant temp sensor, blanking bolt and pipe removed cleaned and then put back to specified torque.
Still waiting for the inlet manifold. I have been promised Tuesday, so we'll have to see as now i am ready to start reassembly (I think) and its the only thing i am waiting for!
1995 E36 B3.0 Convertible (rebodied)
1996 E36 B3.2 Touring No:20 - 1 of 5 made
1997 E36 B3.2 Touring No:36 - 1 of 5 made
1999 E36 323 Sport Touring
2011 E92 D3 Bi-turbo no.246 (santorini blue)
2019 Fiat Fullback
2020 Mini Countryman SE (PHEV)
Alpina, BMW and Detailing Enthusiast
1996 E36 B3.2 Touring No:20 - 1 of 5 made
1997 E36 B3.2 Touring No:36 - 1 of 5 made
1999 E36 323 Sport Touring
2011 E92 D3 Bi-turbo no.246 (santorini blue)
2019 Fiat Fullback
2020 Mini Countryman SE (PHEV)
Alpina, BMW and Detailing Enthusiast
-
jrsmitchell
- A

- Posts: 83
- Joined: Mon Jul 23, 2012 10:34 pm
- Location: Mississauga, ON, Canada
Great work on the exhaust cleanup. Amazing results! 
I don't see a complete pic of the manifold, but it looks like the 3.2 doesn't have the longer-tube headers that the 3.0 has?
I don't see a complete pic of the manifold, but it looks like the 3.2 doesn't have the longer-tube headers that the 3.0 has?
Jeff | '94 BMW Alpina B3 | '06 BMW 325XI Wagon

-
jrsmitchell
- A
- Posts: 83
- Joined: Mon Jul 23, 2012 10:34 pm
- Location: Mississauga, ON, Canada
Aha, thanks for the education.simon13 wrote:all RHD B3's use the standard exhaust manifolds, the steering linkage gets in the way of the LHD manifolds
Jeff | '94 BMW Alpina B3 | '06 BMW 325XI Wagon


Transition metal chemistry at work - I love itshaziman wrote:If this is the case, then you need to use a 'fallout remover'
This convert the iron particles into to liquid (i think) and then they wash away.
I use an auto smart product, but the favourite is Car-pro Iron-X. It turns purple as it works so you can see it doing its job.
For those who are interested, the iron particles form complexes with phenol based bidentate ligands, producing a water soluble molecule which gives a purple colour.
On a more practical basis, this is why people poisoned with cyanide are given iron sulphate as the iron complexes with the cyanide ions, rendering them harmless.
And on an even more practical basis, the iron in your blood is an essential part of the structure of haemoglobin, allowing oxygen and carbon dioxide molecules to "attach" and be transferred to and from the lungs/cells. The only problem is that carbon monoxide attaches more readily and prefers not to detach ...
Sorry, it's half term, I'm away from the classroom and I'm bored!
Charles
Teacher of Chemistry and driver of ALPINAs - not necessarily in that order
B3S Touring (49/116) - been to the moon and now on the way back!
Renault Grand Espace - not mine but the wife's!
Teacher of Chemistry and driver of ALPINAs - not necessarily in that order
B3S Touring (49/116) - been to the moon and now on the way back!
Renault Grand Espace - not mine but the wife's!